Alright everyone! This post is especially for those of you knitting my Victory beret as one of your first fair isle projects, for Knit for Victory.
I’ve talked about stranded knitting / fair isle in the past, and have two older posts that extensively cover a few of the topics I’m going to touch on today. For easy reference those are:
I don’t want to reinvent the wheel here exactly, so today’s post is all about techniques involved when getting your feet wet with stranded knitting (although I would still recommend you read through those two posts at some point, too). I’ll touch on these topics a bit in future posts, but I wanted you to have a helpful resource post you can turn back to when you sit down and start swatching for Victory, or start the beret itself. So this is The Big Post you’ve been waiting for. I don’t claim to be an expert, just a practiced stranded knitting fanatic, and I hope this will help get you started.
I’m going to cover a few things today:
- Options for how to carry your yarn
- Consistency in how you carry your two colors across a row
- Tips for maintaining good tension
It’s a long one, so settle in. Let’s get started!
Options for carrying your yarn
I discussed it in depth in this post on getting started with fair isle, but I’ll say it again: there’s no wrong way to work stranded knitting, so long as it works for you.
Roughly, your options are:
- Option #1 – carry both strands of yarn in the same hand (either across the same finger, or on different fingers, or using a little device on your finger)
- Option #2 – carry one strand in each hand (this requires you to know how to knit in both English and Continental styles, i.e. throwing and picking)
- Option #3 – carry one strand of yarn and drop and pickup the next color as needed
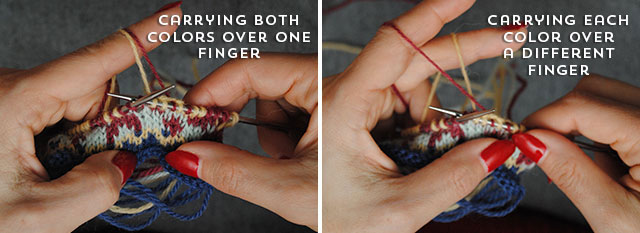
Option #1 carries both colors in the same hand, whichever hand you normally carry your yarn in. You can either carry both strands across one finger, or one strand on each of two different fingers. That adds another level of complexity that means my brain can’t wrap around working in this method, but many people do it this way! One thing you have to be careful about is being consistent with how you carry the yarn (which I’ll touch on more later), always carrying the same strand on top and the same on the bottom so you don’t get tangled skeins.
Carrying both strands in your right hand (‘throwing’):

Carrying both colors in your left hand (‘picking’):
Or, you can use a little doohickey called a knitting thimble or a ‘strickfingerhut’. I’ve never used one, but you can read Kate Davies’ thoughts on using them. If you can’t seem to get your brain to translate stranded knitting to your hands, it might be worth trying out one of these devices. (You can buy a knitting thimble from Amazon and JoAnn’s.)
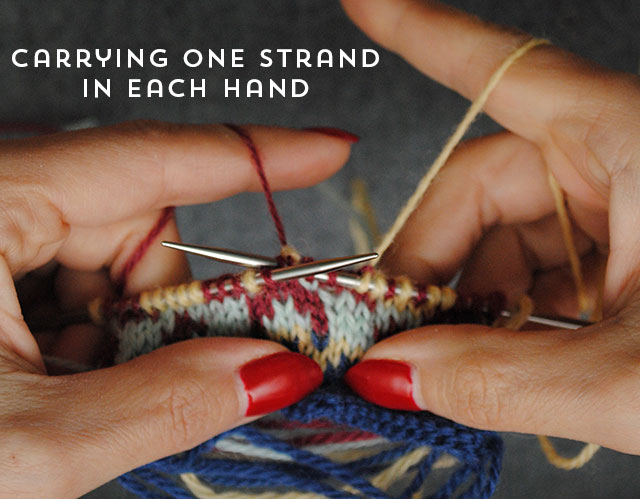
Option #2 is what I do. I carry one strand of yarn in each hand. Because of this, one ball of yarn sits on my left side and one on the right, and I never have to worry about getting them tangled. As I mentioned I normally knit English style, ‘throwing’ my yarn with my right hand. I can knit Continental, but I can’t purl that way, and I don’t prefer to knit that way on its own, so I save it only for two-color knitting only. Working this way and shown below, I’d knit all the yellow stitches with my right hand, and all the red stitches with my left hand.
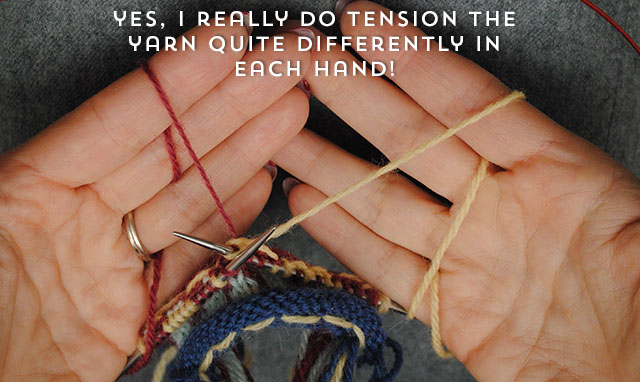
And yes, I tension the yarn completely differently between my hands, and that’s okay. I tension my left strand the way I learned to carry yarn for crochet (before I ever knit), and it’s not at all the same way as I do it in my right hand. But I get even knitting tension doing it this way, and that’s all that matters.
When I very first started stranded knitting, I used Option #3. I couldn’t get my fingers to do Option #1 (although I did use this method for a little while, quite clumsily). And I didn’t know how to knit Continental, so I did what made the most sense to me. I’d knit along in one color until I got to when I needed the next color, dropped the first color and picked up the second, and merrily continued along like that.
You’ll rarely see anyone cite Option #3 as a valid way to work stranded knitting. It’s a slow way to work, especially if you have to change colors frequently. You also have to be consistent with picking up each color in the same manner (one always over, one always under) or you’ll get tangled skeins, but that’s the same with Option #1, too.
So in my opinion, if it works for you and produces results you are happy with, who’s to judge? When you’re just starting off, try a bunch of ways to see what feels best for you. You may do it one way for a number of weeks / months / years and then change your technique!
Be consistent with how you carry your two colors
One of the keys to stranded knitting is a pretty simple concept: be consistent with how you knit from the two (or sometimes more) balls of yarn you’re using in a row.
This is for two main reasons: keeping your working yarns tangle-free and color dominance.
When you knit with two colors in a row, one color is always above the other one. Doesn’t matter how you knit, this is always the case.
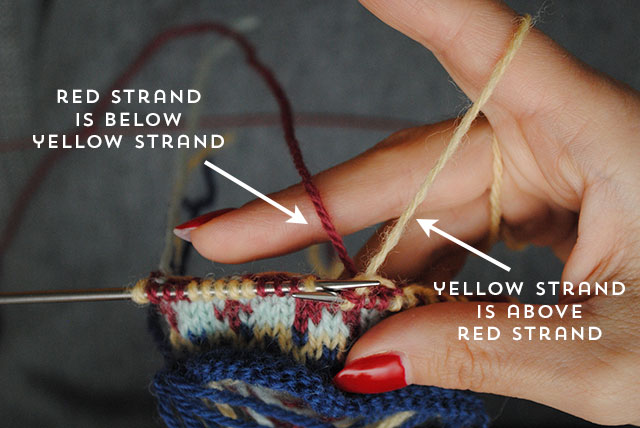
So what you want to do is make sure that one color is always above and the other color is always below. And do it the same way every time.
Typically, the background color is carried above, with the main color carried below. (In two-hand stranded knitting, that has the main color in the left hand, background color in the right hand, like I showed above.) This relates to something called color dominance (or yarn dominance). One color is usually very slightly dominant over the other color, making those stitches every so slightly larger, and thus more prominent in a design. There’s a fantastic visual example here to show the difference this can make if you change this up.
For most people, it’s the yarn that’s carried under that proves to be a little more dominant, and thus you’d want it to be the main color. Now, this isn’t always the case for everyone. Consummate designer Donna Druchunas was just having an interesting discussion on this topic earlier today on Twitter, and some people chimed in how the color they carried under wasn’t necessarily the dominant one (for various reasons, including having a looser tension on the upper yarn).
When you’re just starting off, I’d say don’t worry about it too much. Your bet bet is probably to carry the main color under and the background color over, since that usually makes the main color more dominant as I said. But most importantly, be consistent, whichever way you pick.
Let me repeat that again: always do the same thing. You want the background color in the same place, every row, the entire project. And you want the main color in the same place, every row, the entire project.
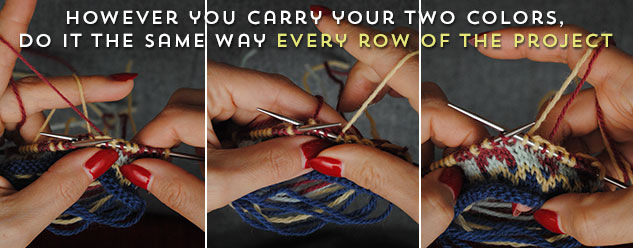
For me, that’s always carrying the main color in my left hand, and the background color in my right hand. Every project, every row, every time.
My tips for good tension
Prior to writing up my post on tension, puckers and even stranded knitting a couple of years ago, I spent a long time trying to figure out what exactly was my key to maintaining good tension. And of course, there’s lots of things involved. Practice makes perfect, as they say. But that doesn’t mean if you’re starting out that you have to suffer through a bunch of crappy looking fair isle until you get the hang of it!
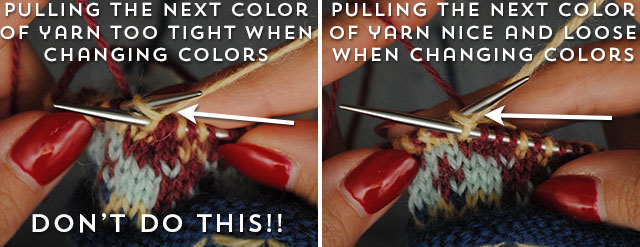
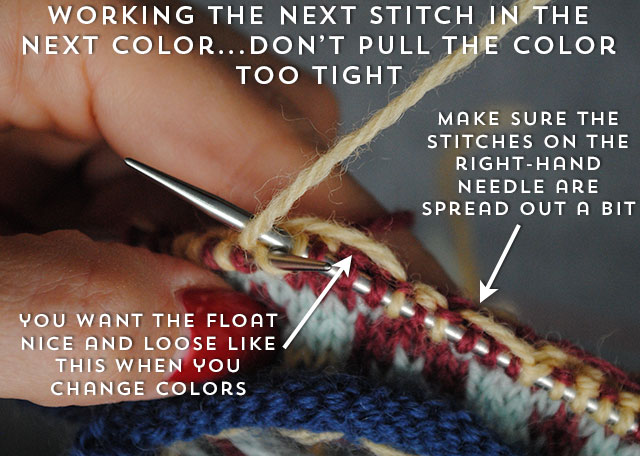
Here’s my best advice to help you right from the get-go: make sure that you’re not pulling the next color tight when you change colors. And at first, this might seem counter-intuitive. You’re changing colors, and you may worry that you’re liable to make things loose and floppy. But you won’t! The worst thing you can do is pull the yarn too tight when you change colors.
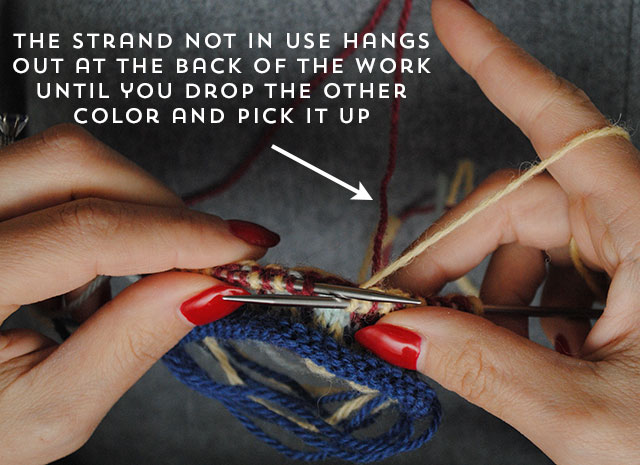
In stranded knitting, the color not in use (no matter how you choose to carry your yarn) gets ‘stranded’ across the back of the work until you knit the next stitch that calls for that color. That strand of yarn at the back of the work between color changes is called a float.
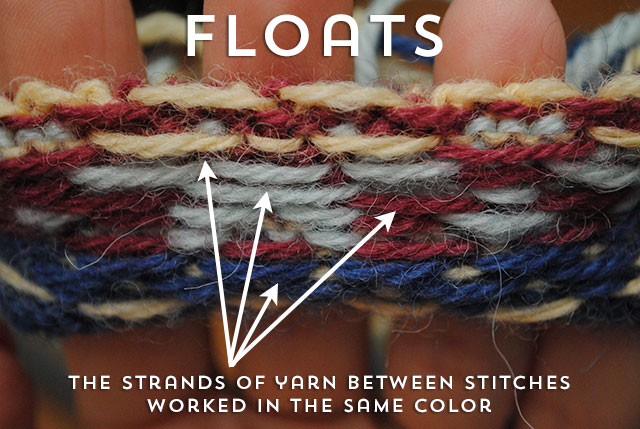
Floats can make or break your stranded knitting. See how they look nice and loose? They aren’t clinging too tightly to my knitting, they’re just kind of hanging out there.
If you pull the next strand of yarn too tight when you change colors, you’ll get puckered knitting that even an aggressive blocking can’t fix. Period. So don’t do that.
How do you keep it nice and loose when you change colors, then? Here’s what I do.
Below, I’m about to change colors. I just knit three stitches in red, and the next stitch needs to be yellow:
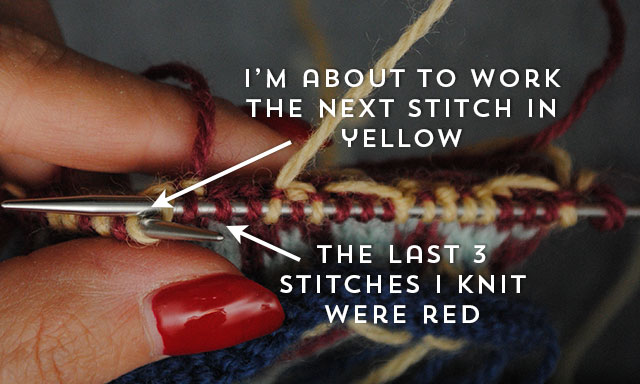
Before I work the next stitch in the new color (yellow), if the stitches just worked on my right-hand needle are at all scrunched up, I spread them out slightly. It’s a small movement, a tiny flick of my right fingers. And it makes all the difference.
If the stitches on the right-hand needle closest to the color change don’t have breathing room, give them a little breathing room when you change colors. See how my stitches are nice and spread out? That’s exactly what you want when you change colors. Breathing room.
It may seem like something that’s hard to keep track of, but pretty soon you’ll get into a rhythm and you won’t even think about details like this. When you start off with stranded knitting, if you find you work looser than you’d like, you can always go down a needle size. But if you pull those color changes too tight and end up with a severely puckered piece of knitting, you won’t be able to fix it.
So give those stitches nearest your next color change breathing room, and you’ll be rewarded for it in the long run!
Next up–swatching
Of course I’ll continue to offer tips and cover other related topics along the way as we knit our fair isle berets as part of Knit for Victory, but if you’ve ever been scared of stranded knitting, I hope this helps bring it down to earth for you a bit!
In my next post, I’ll cover some ideas for swatching for Victory in the fair isle pattern in the round, to make sure you get gauge before you start.
Catch up with the Victory beret:
For those of you in the U.S., have a wonderful Thanksgiving holiday!! We’ll cover more, soon.


